Setting up the Auto Poster Plugin for Facebook is conducted in three steps:
- Creating and basic setup of the Facebook App;
- Setting up the Auto Poster plugin and connecting it to the newly-created Facebook App;
- Submitting the App for review to Facebook.
Creating and basic setup of the Facebook App #
NOTE: To be able to post on Facebook, whether to a business page or a Facebook group, you must have a verified business Facebook account. You can learn more about business verification here.
To create and configure the Facebook Auto Poster plugin, follow these steps:
1. Go to My Apps – https://developers.facebook.com/apps/ – and click the Create App button. You will see three options.
Pic 1
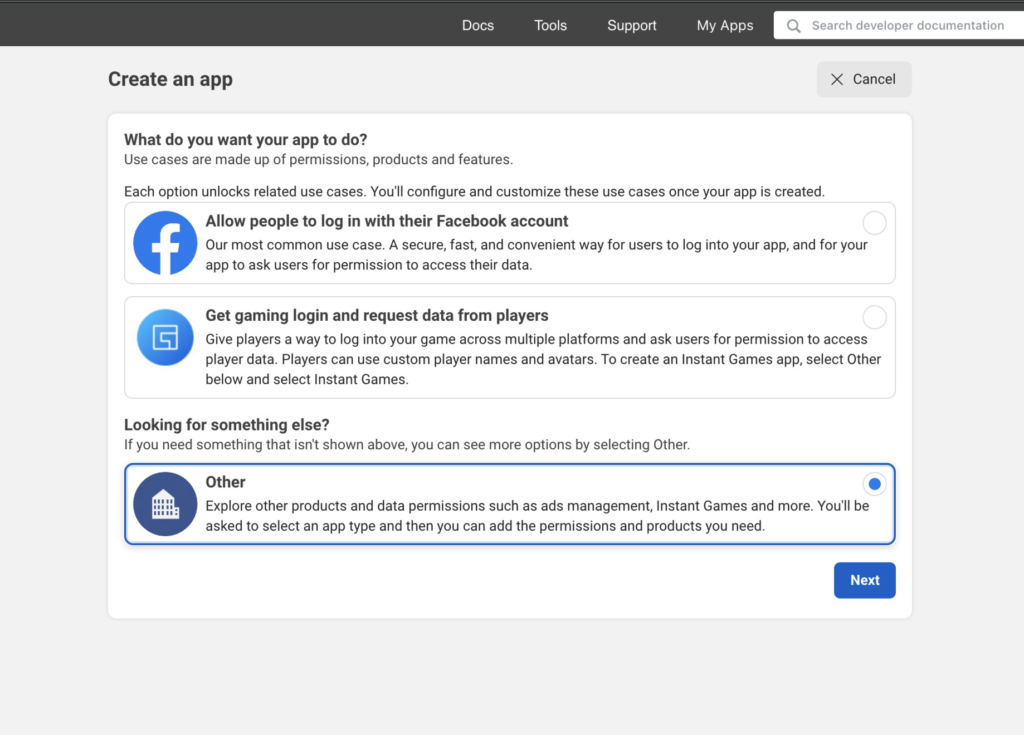
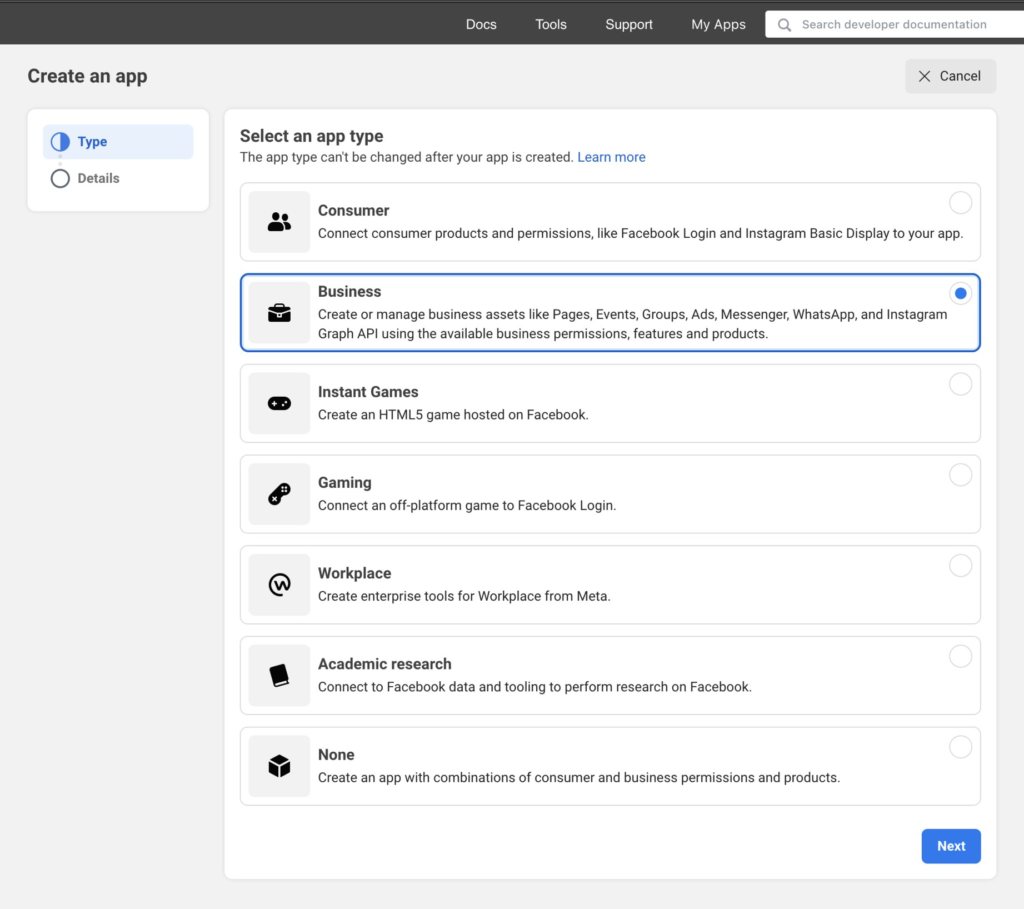
2. Select the Other option and click the Next button. This will take you to another page where you’ll need to specify the type of your app. Choose Business as the principal purpose and click the Next button.
Pic 2
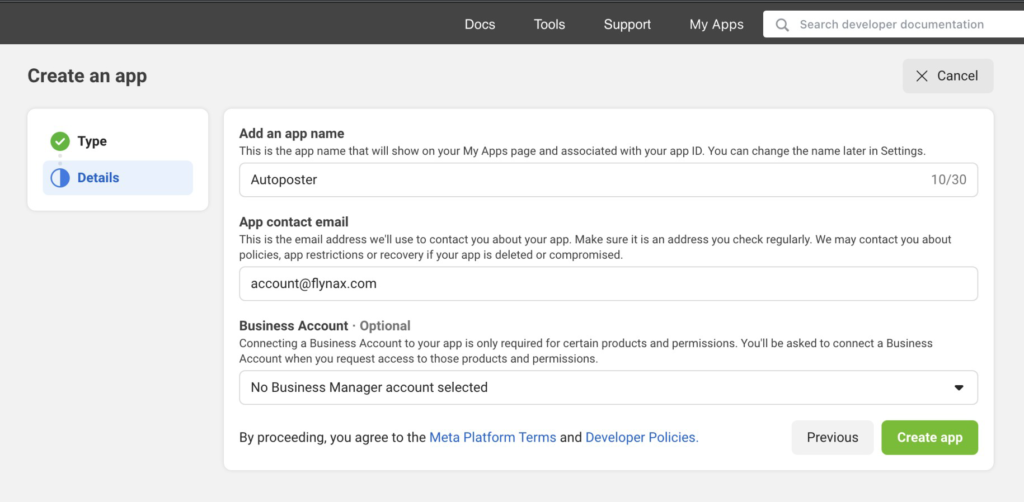
3. You will need to enter your App name, email address that will be used by Facebook to contact you, and the purpose of the App. Select a Business account if you have it.
Pic 3
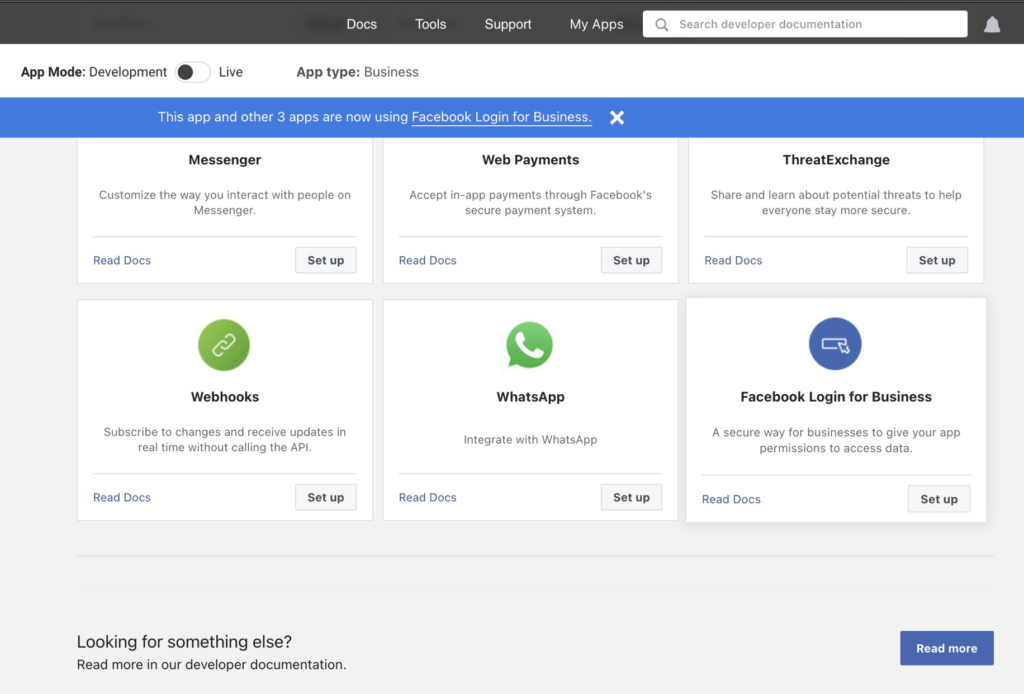
After entering the name of the App and your contact email, you will be directed to the main page of your App. Here, you’ll be able to set up a Facebook Login scenario. To begin, select this option and click the Set up button.
Pic 4
4. Now, you’ll need to configure the Facebook Login For Business module. To do this, go to Products > Facebook Login For Business > Settings.
Pic 5
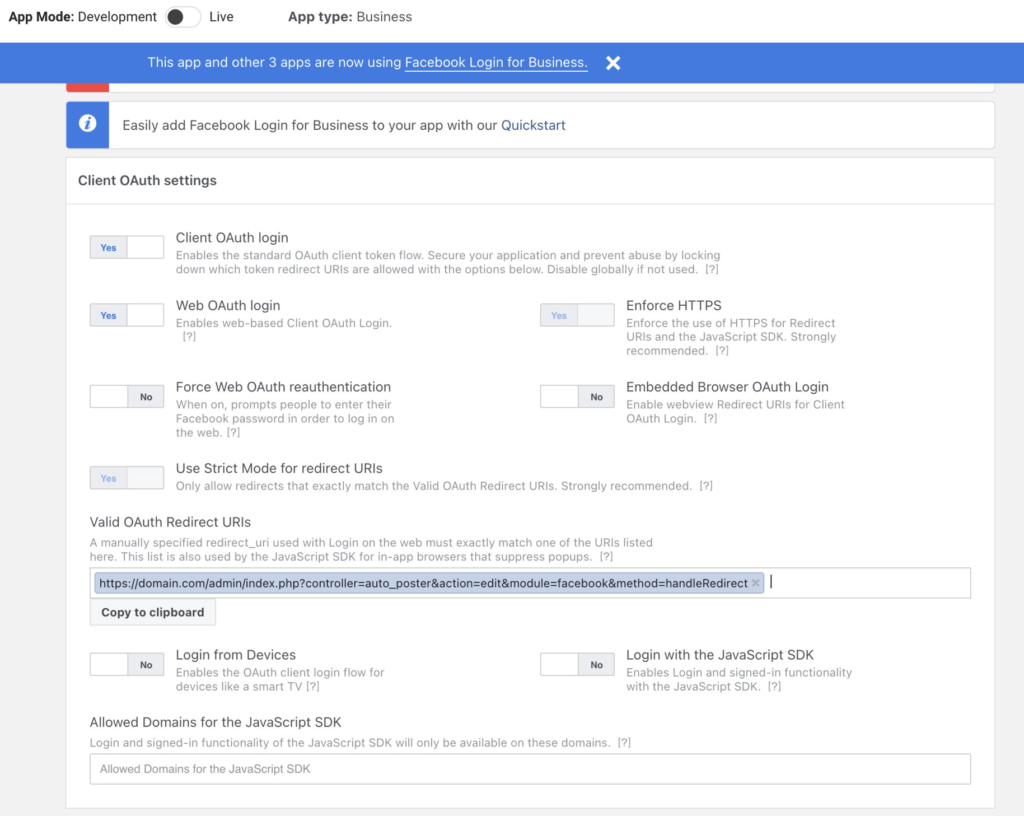
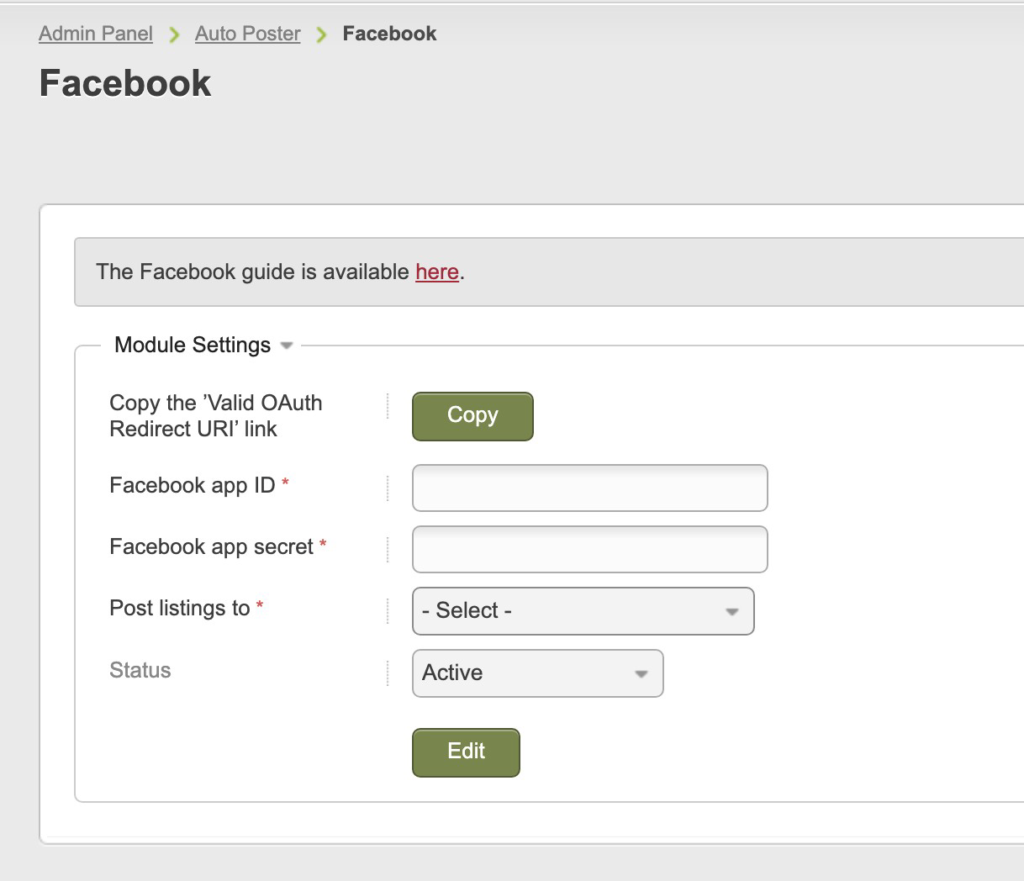
After reaching the page shown in Pic 5, proceed to configure the Valid OAuth Redirect URIs. You can find this information in your Flynax-powered admin panel. Navigate to the Facebook module configuration page located in the Flynax Admin Panel > Plugins > AutoPoster (See below) and click the Edit button. This will open the configuration page for the Auto Poster plugin. Click the Copy button and return to the page shown in Pic 4. Paste the copied value into the Valid OAuth Redirect URIs field and save the changes.
NOTE: The link you are pasting in the field should have the following structure: https://{yourdomain}/{site_adminFolder}/index.php?controller=auto_poster&action=edit&module=facebook&method=handleRedirect
NOTE: If you intend to post listings in a Facebook group, switch your product from Facebook Login for Business to Facebook Login.
Pic 6
5. Next, proceed to configure the basic settings of the App by going to Facebook Application Dashboard > App Settings > Basic.
Pic 7
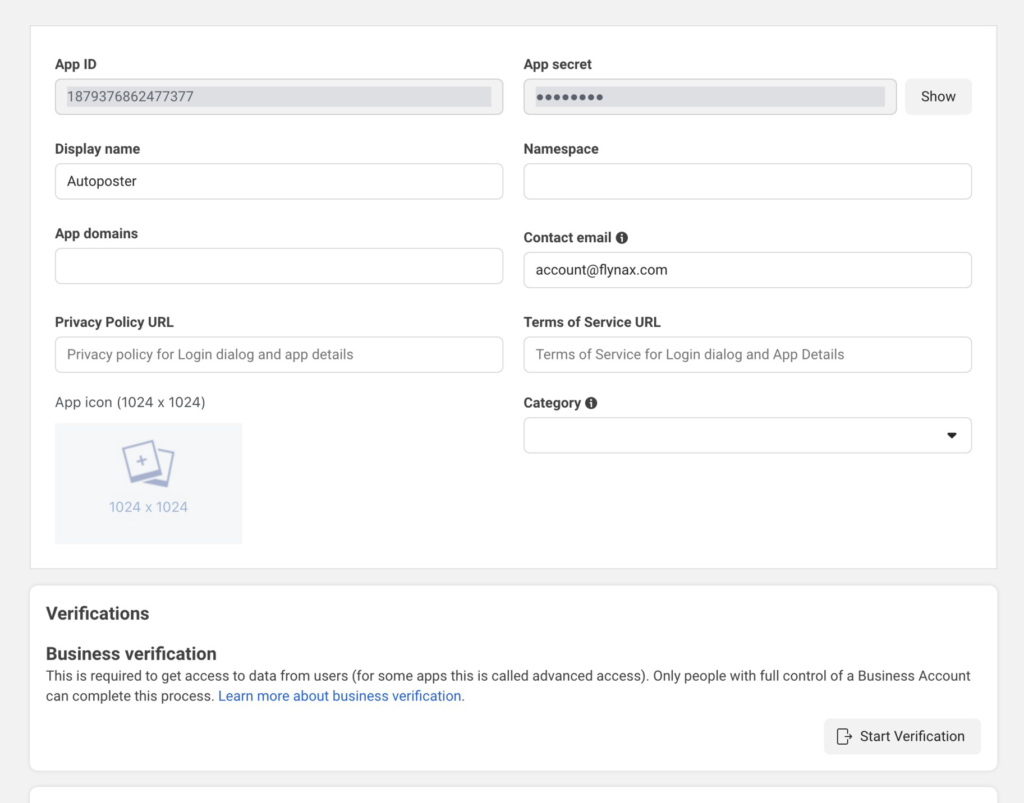
On this page, you’ll be asked to fill in the following fields:
A. App Domains: enter your domain name, for example, domain.com;
B. Privacy Policy URL: Provide a link leading to the page with the Privacy Policy on your website;
C. Term of Service URL: This field is mandatory, just like the Privacy Policy URL field;
D. Category: Select the option that best fits your business.
The App Icon field is not required; you can either skip it or upload an icon that visually represents your App.
At the bottom of the page, you’ll find an Add a Platform button. Click it, select the website platform, and enter the URL of your website in the appropriate field. For example:
- Your Valid OAuth URIs: https://{yourdomain}/{site_adminFolder}/index.php?controller=auto_poster&action=edit&module=facebook&method=handleRedirect
- Your domain: {yourdomain}
- Your website address: https://{yourdomain}
After filling in all the required fields, be sure to save the changes.
NOTE: Below, you’ll find a Verifications section. If you haven’t yet undergone the verification process, you’ll need to complete it at this stage.
Configuring the Auto Poster plugin #
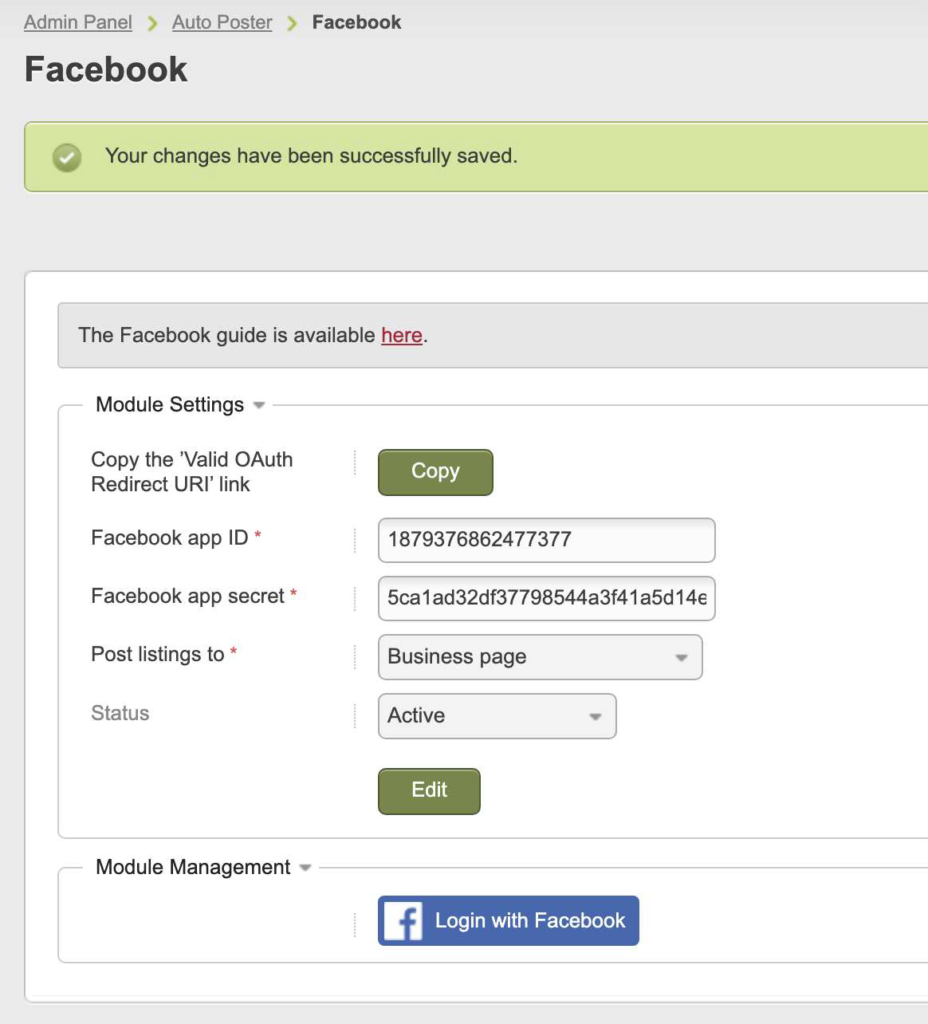
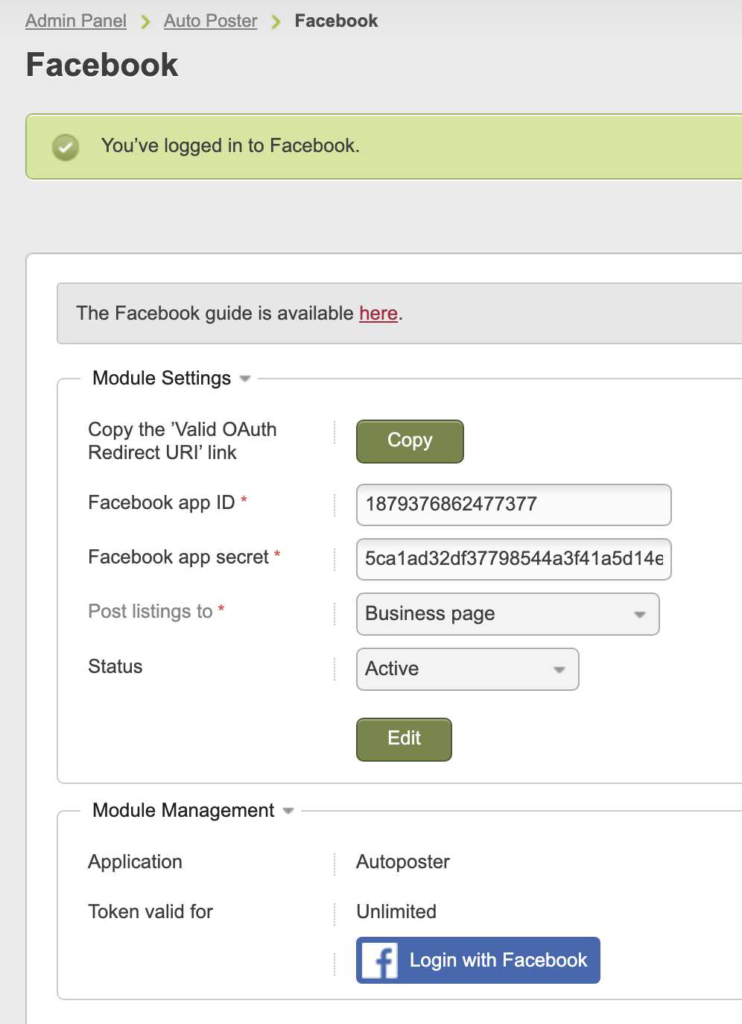
1. The primary settings (as shown on the screenshot below) can be accessed in the admin panel of your Flynax-powered site at Admin Panel > Plugins > Auto Poster > Facebook > Edit.
Pic 8
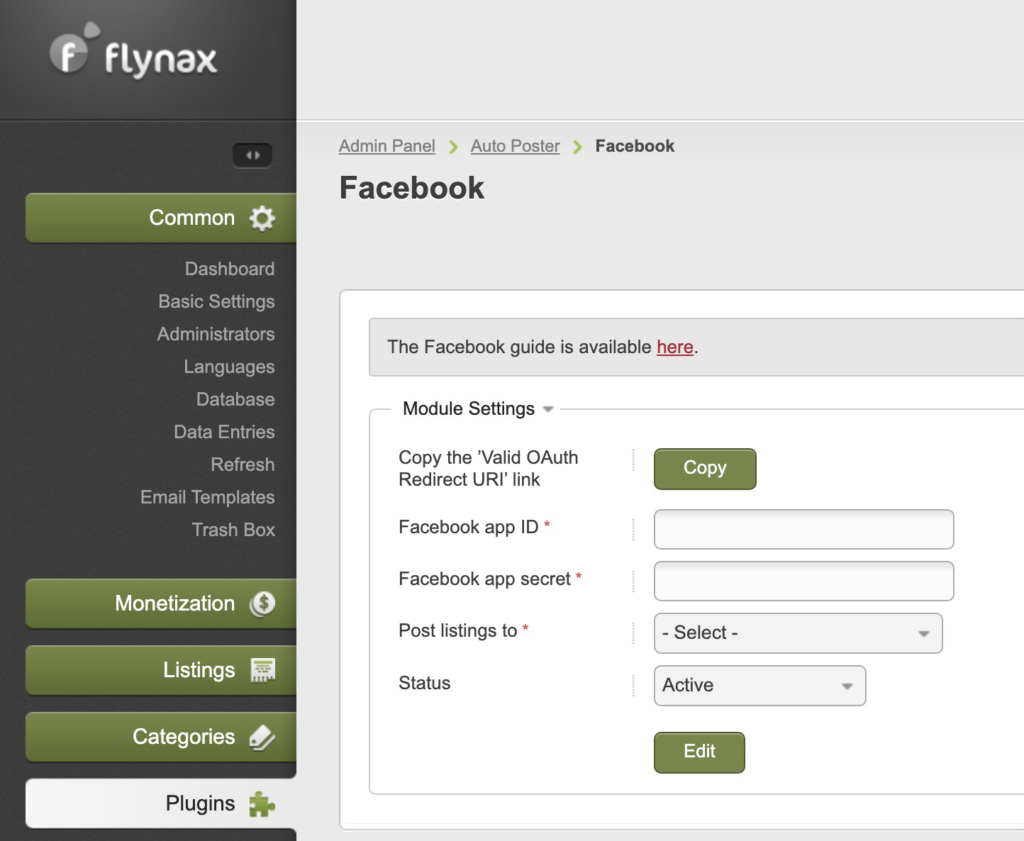
The Facebook app ID, Facebook app secret, Post listings to, and Page/Group ID fields are mandatory.
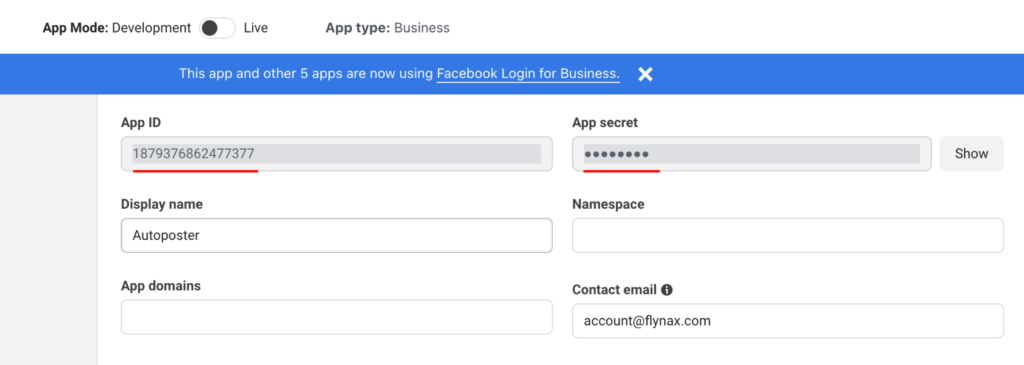
A. To fill in the first two fields, you’ll need to return to the main page of your Facebook App. From there, go to Dashboard > Settings > Basic and locate the required App ID and App Secret. You should copy the values of these fields and paste them into the corresponding fields in the Auto Poster plugin manager.
NOTE: Make sure to click the Show button on the right of the App Secret field before copying the App Secret value.
Pic 9
B. After that, you’ll be prompted to select the Post listings to option, specifying whether your posts will be published to your business page or to a group.
If you choose to post to a business group, the last field, Page/Group ID, will require you to input the ID of your group. The Page/Group ID field will be hidden if you choose to publish to the business page; its ID will be generated automatically.
NOTE: The ID is a unique identifier for your group, consisting entirely of digits.
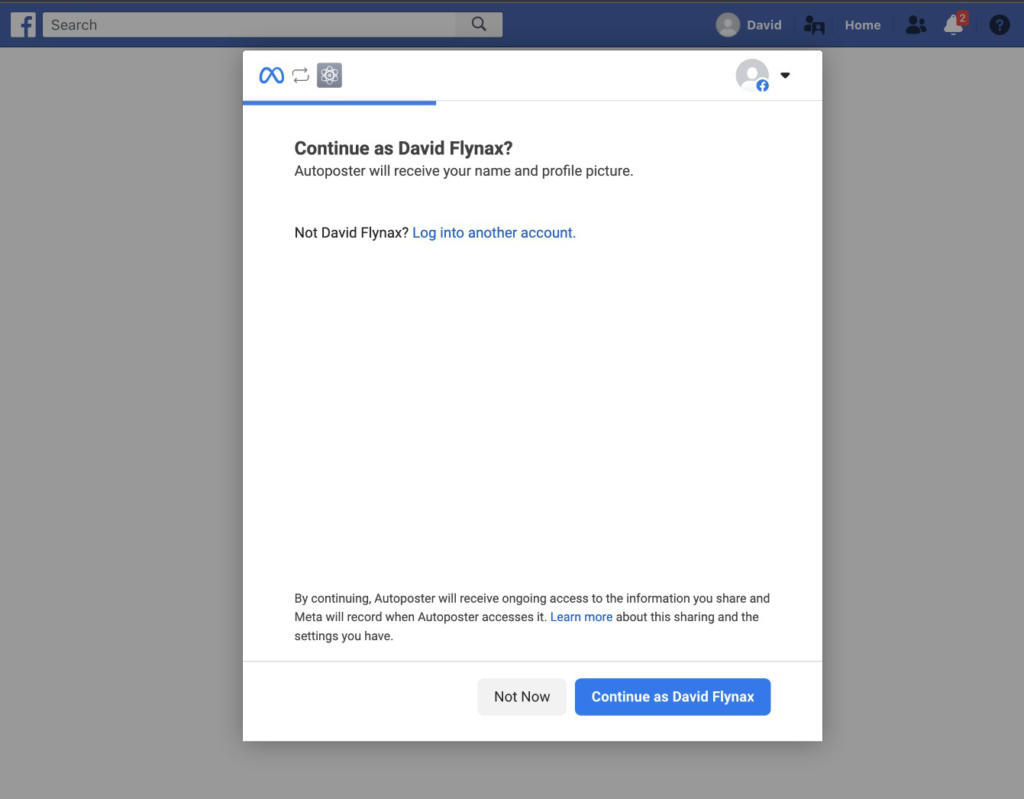
2. After configuring all the fields and saving them, it’s time to link the Auto Poster with the newly created Facebook App. To begin, click Login with Facebook. Before clicking the button, be certain that you’ve logged in using the same account you used to create the Facebook App or another account that was added as an administrator to the Facebook App.
Pic 10
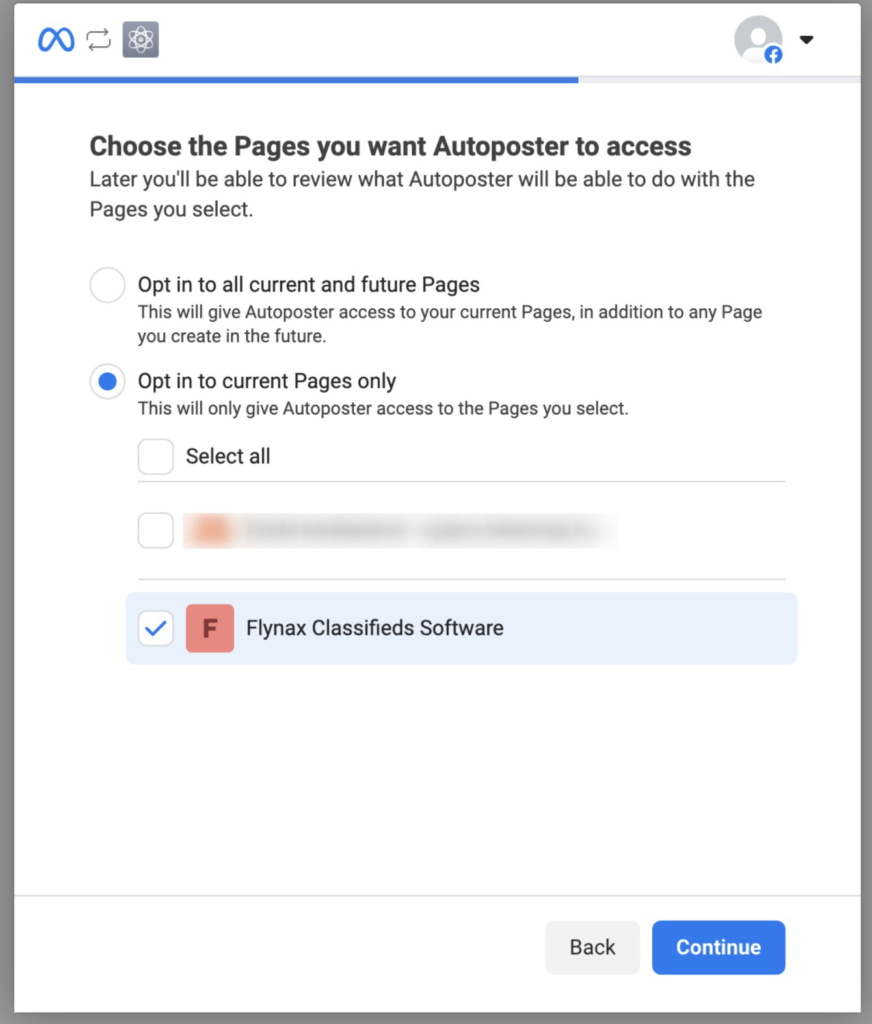
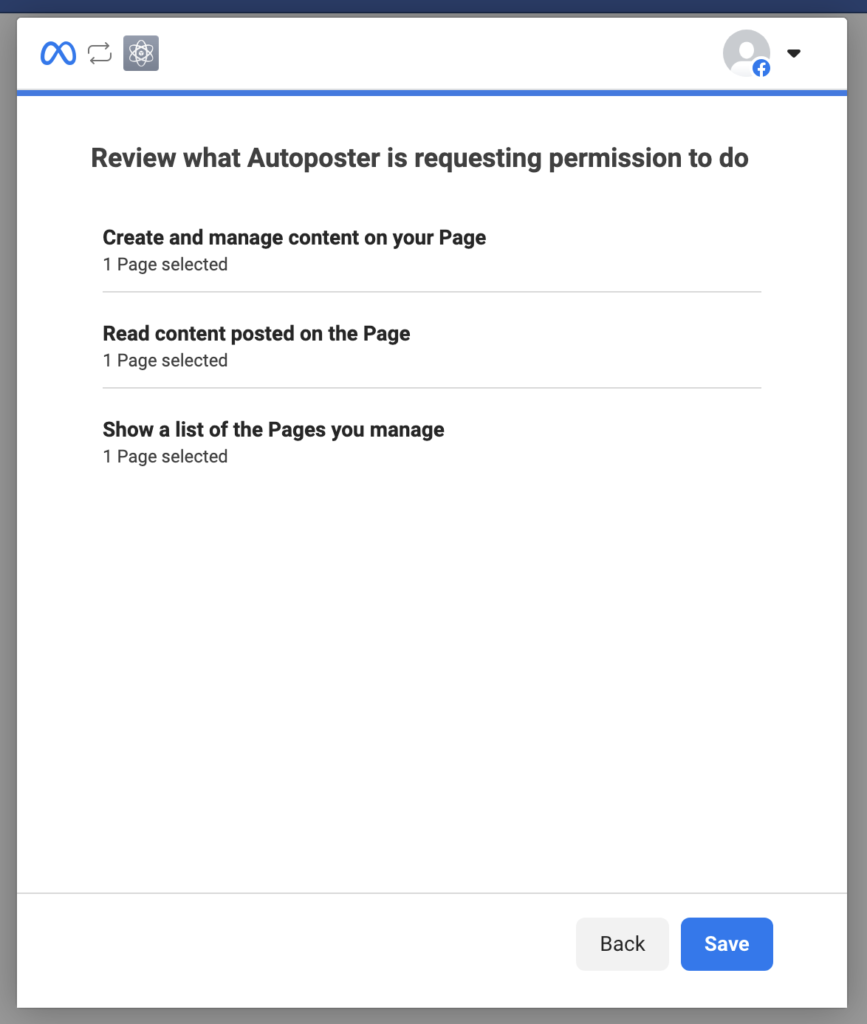
3. After creating the business page, Facebook App, and configuring the App from the Flynax admin panel, you’ll need to establish the connection between these three elements. You must grant the app access to your page/group. If you’ve chosen to post to the business page, a list of pages available for selection will be presented. You should choose a specific page to which you intend to post your listings. It’s not possible to select multiple pages for posting. If you opt to post to a group, you’ll need to accept access to the group.
Pic 11
Pic 13
Pic 14
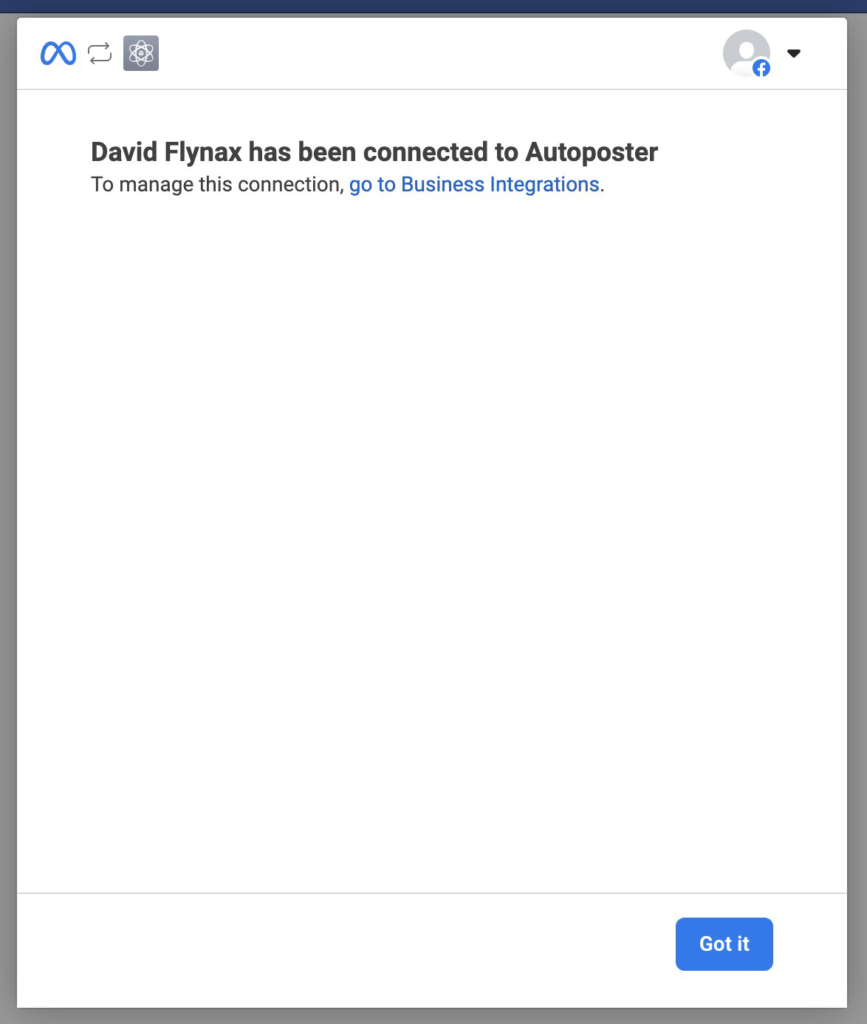
Provided that everything has been configured correctly, you will see the application’s name and the duration of the token’s validity displayed above the Login with Facebook button.
With these steps completed, the Auto Poster will now transmit posts to either your group or business page, depending on your earlier selection.
Remember that all these changes should be made in the Development App mode. Do not switch to Live mode until you’ve finished setting up the App, as doing so prematurely will result in an error.
Pic 15
4. This setting is mandatory. Now, you need to create a posting pattern for your posts. The Plugin provides the option of an automatic post pattern, enabling you to create dynamic titles for your posts. To configure this option, navigate to your Admin Panel > Categories > Edit category. At the bottom of the page, you’ll find the option where you can add both static and dynamic values. For example, by specifying the value New listings in {country} with a price {price}, you’ll have the {country} and {price} values change dynamically when composing a title for your post on your Facebook business page or group. Before proceeding to the next step, ensure that you configure this pattern for all general categories and subcategories.
Now, post a free listing on your website and check the auto-posting to the Facebook page/group. These posted listings on the Facebook page/group will be visible only to you and other administrators of the app. These posted listings should make the first request via the Facebook API to request the necessary permissions, which will be part of the App Review process later.
The required permissions will become available for App Review after 24 hours.
Pic 16
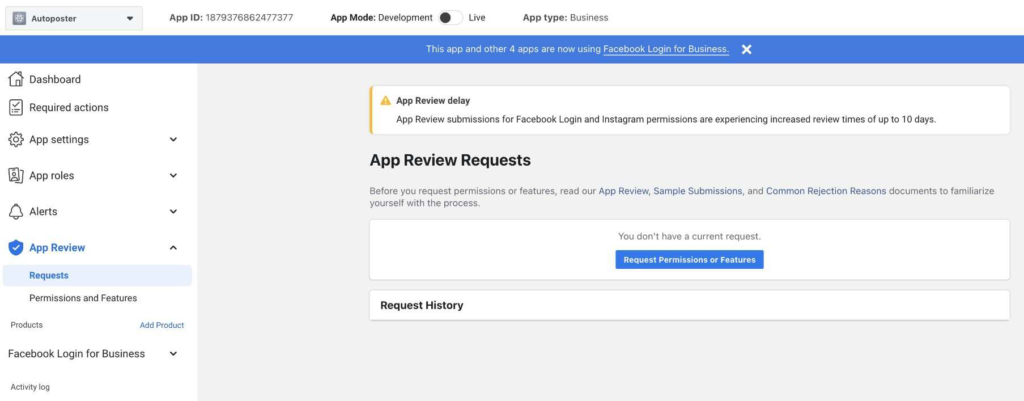
Sending the Facebook App for review #
Once you’ve configured the Auto Poster App and verified that your ads are successfully posted on your business page or group on Facebook, you can proceed to request Facebook’s approval for your newly created Facebook App. This approval is essential to activate the App and maintain the required permissions. Here’s a step-by-step guide to obtaining Facebook’s approval:
1. Go to the Facebook Application Dashboard > App Review > Requests and click Request Permissions or Features (refer to Pic 13).
Pic 17
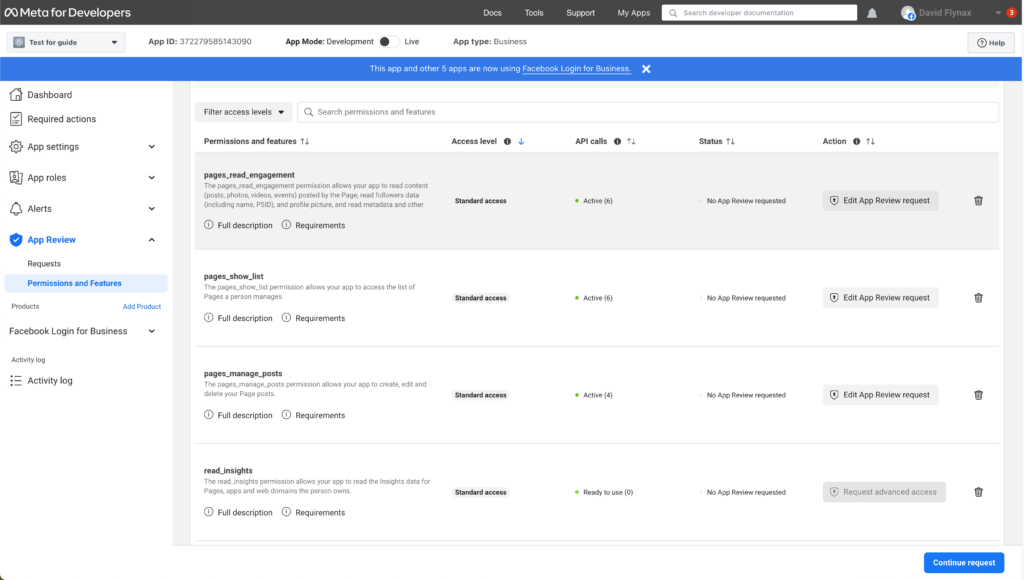
Permissions for business page and group
The Auto Poster plugin allows for the automatic posting of your ads to either your business page or group page, and each type requires specific permissions:
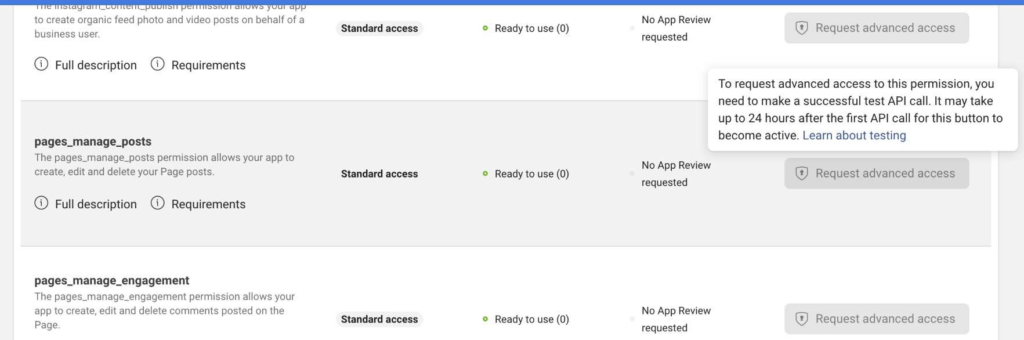
A. To post ads to your business page, your app must have advanced access to the following permissions:
⦁ pages_manage_posts;
⦁ pages_show_list;
⦁ pages_read_engagement.
B. To post ads to your group, your app must have advanced access to the following permissions:
⦁ publish_to_groups, and
⦁ groups_access_member_info
All these necessary permissions will be automatically requested by the Auto Poster plugin, but it’s essential to have this list ready for the App Review.
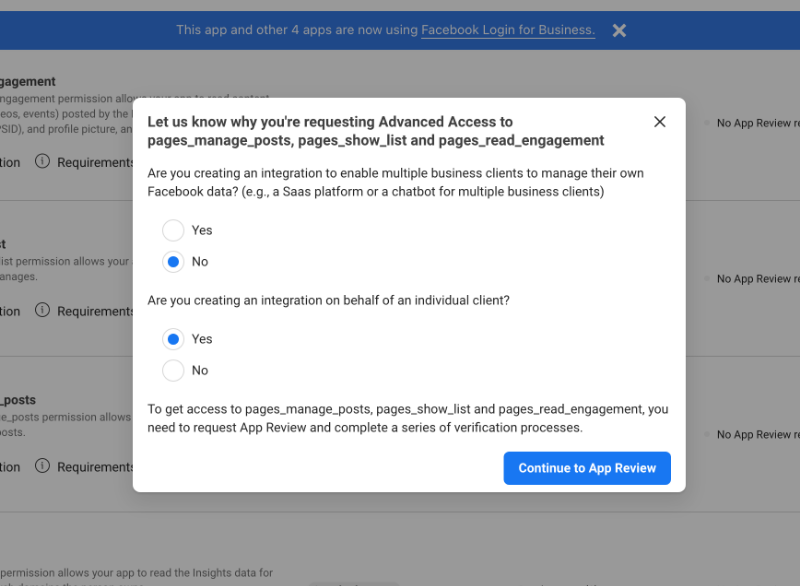
2. Requesting advanced access for necessary permissions
2.1 You need to click the Request Advanced Access button for all the necessary permissions listed above. Afterward, click the Continue request button.
Pic 18
2.2 The system will display a popup with two questions. Select No for the first question and Yes for the second question, then click Continue to App Review.
Pic 19
A. Filling in the fields
A form will appear, asking you to provide the following information:
A. Tell us how you’re using this permission or feature: Describe how you intend to use the Facebook App, emphasizing that it’s solely for posting ads to your page or group and that you are the owner. This clarification will simplify the approval process.
B. In the Demonstrate how your selected platforms will use this permission or feature section, select Web.
C. After choosing the Web option, you’ll be asked for a detailed description of how your App will work. Here’s an example of a step-by-step description of how the App functions:
- Navigate to the website’s admin panel (provide a link).
- Access the configuration manager of the Facebook Auto Poster plugin (include a link).
- Configure the App by entering the Facebook App ID, Facebook, and Facebook Page/Group ID.
- Click the Login with Facebook button.
- Accept all agreements that appear in the standard modal window for Facebook Auth.
- Set up automatic posting patterns for messages on the category pages.
- Visit your website’s front end and create a listing.
- Verify that the added listing is posted to your Facebook page or group.
D. In the Show us how you’re using this permission or feature section, you’ll need to record a video of your computer screen. This video should demonstrate the steps you described earlier. It should show how you navigate to the page for configuring the module for your Facebook Auto Poster plugin, click the Login with Facebook button, agree to the permissions request in the standard modal window for Facebook Auth, set up automatic posting patterns for messages on the category pages, add a listing, and confirm that the listing is posted to your Facebook page or group. The post’s title should dynamically reflect the message generated based on the pattern configuration.
In essence, the video should illustrate that your App is using the selected permissions as you described. The Facebook team will pay close attention to the post titles to ensure that they are generated dynamically and controlled by you, rather than by the Plugin without your involvement. Lastly, you must explicitly demonstrate that posts are indeed posted to the page you specified in the Plugin settings.
If you don’t see the modal window when clicking the Login with Facebook button, follow these steps to clear the App’s cache:
- Click your profile picture in the top right of Facebook;
- Select Settings & privacy, then click Settings;
- Click Business Integrations on the left side;
Pic 20
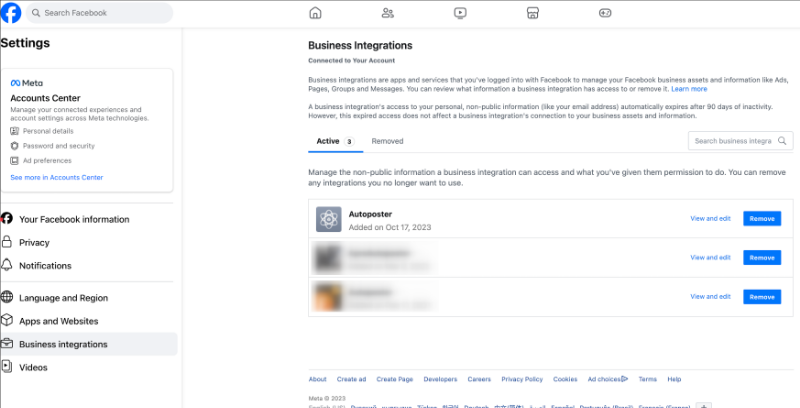
4. Select Apps and Websites or Business Integrations on the left side.
5. Locate your App and click Remove.
Doing this will clear the App’s cache, and the next time you click the Login with Facebook button, you will see the modal window.
Uploading the video and completing the review
After requesting advanced access to each necessary permission, you will need to upload a video to the ‘Screencasts’ section in the requirements. Click the Save button after each upload and repeat this process for all the remaining permissions.
Please note that the review process usually takes 5-10 days. To facilitate this process, you’ll need to perform the following steps:
1. Share your Facebook account details with Facebook moderators or create a new test Facebook account that will be added as an administrator to your Facebook App. This step is essential as only administrators of the Facebook App will have access to its functions in the development mode.
2. Share your website’s admin account details with Facebook moderators or create a new test admin account. This is necessary for the Facebook moderator to check the Facebook configuration and test the functions in the plugin. They will need to click the Login with Facebook button, configure posting patterns for categories, and perform other related actions.
3. Share account details from the front end of your website with Facebook moderators or create new accounts. This is essential to allow the Facebook moderator to create test listings and check the auto-posting functionality.
Completing these steps will help speed up the review process and ensure your Facebook App is ready for use after approval.
Example of submission details for Facebook App review
For each permission or feature, you may use the same text and video. Here’s an example submission:
Permission: pages_manage_posts
- Is a Facebook reviewer able to access or log in to your app to verify that you’re using permissions or features according to Facebook Platform Policy? – Yes
Platform Settings
- Desktop
- Site URL: https://domain.com/
- Testing login: test
- Testing password: 111111
- Admin panel of the website: https://domain.com/admin/
- Testing login: test
- Testing password: 111111
- Facebook Test Login Details (Use these Facebook credentials for testing, as the App will work with authorized accounts only).
- Email: login-of-your-test-facebook-account
- Password: pass-of-your-test-facebook-account
Steps to verify use of “pages_manage_posts” permission:
- Open the admin panel of the website (https://domain.com/admin/index.php) and log in.
- Navigate to the configuration manager of the Facebook Auto Poster plugin (https://domain.com/admin/index.php?controller=auto_poster&action=edit&module=facebook).
- Click the Login with Facebook button.
- Select the necessary Facebook page and accept all agreements that appear in the modal window. This step is essential for obtaining the initial Access token to link the Facebook App and the Facebook page. It should be done once after the plugin installation.
- Open the manager of the {Your category} category.
- Configure an automatic pattern for posting to Facebook. The system will use this pattern to create post titles on the Facebook page.
- Open the frontend of the website (https://domain.com/) and log in as a user.
- Go to the Post an Ad page (https://domain.com/add-listing.html).
- Create a new test listing in the {Your category} category.
- Check if the added listing is posted to the Facebook page ({link of your Facebook page}).
- Open the frontend and access the My Listings page (https://domain.com/my-ads.html) to remove the listing.
- Check if the added listing is successfully removed from the Facebook page.
Video submission:
Please provide a detailed step-by-step video walkthrough of how your app uses the pages_manage_posts permission. This will help confirm that it is being used correctly and does not violate Facebook policies.
For guidance on creating the video, please refer to Facebook’s Submission Guide: Screen Recording.
Repeat these steps for each necessary permission.